For a long time, when you bought a new computer, you could count on a factory recovery partition to keep your data secure. This secret part of the hard disk let users restore Windows to its initially installed out-of-the-box state without requiring any outside media. Modern versions of Windows 10 and 11 commonly use cloud recovery or simple reset functions, however these techniques don’t usually keep specific settings, apps, and drivers. Power users, IT admins, and anyone who manage a fleet of standard PCs all need to be able to make their own Windows 10 factory recovery partition. This custom partition lets you bake your desired setup, including the drivers, security patches, and pre-installed applications you need, right into the recovery image. This makes sure that you have a quick, consistent, and reliable restoration point that really brings the system back to your “factory” standard.
How to Make a Custom Image
-
Getting the Master System Ready (Sysprep)
Set up Windows 10, all the drivers you need, and any important programs (such Office and security software). Install all the Windows updates and changes that are needed.
Make the installation less specific by utilizing the System Preparation Tool to get the system ready for transfer when the installation is done. To remove the distinct system information you need to run sysprep /generalize /shutdown. While the /shutdown command this works by making sure that the system switches off, which is what it needs to do next.
-
Getting the Picture (DISM)
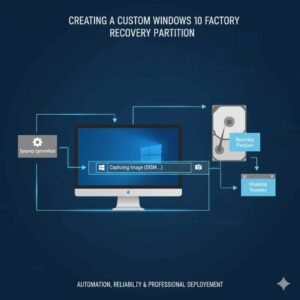
After the master system is ready and switched off, the following step is to utilize the Deployment Image Servicing and Management tool to produce a compressed image file of the whole customized partition.
Take note that taking a picture of an active operating system is not possible. Also, to boot the machine from a Windows Preinstallation Environment USB device, partitioning is required.
The DISM from the WinPE command line can be used to copy the OS partition into a single Windows Imaging Format (WIM) file on an other storage location. This WIM file has everything you need for your custom factory image.
-
Putting Things Into Groups and Deploying Them
To create a look similar to a real factory configuration, you need to have a separate recovery partition on the target system as making the recovery partition by using the Disk Management application or the diskpart command line tool is essential to shrink the main Windows partition and create a new partition for the recovery files. This partition needs to be at least 20 to 40 GB, depending on how big your WIM file is.
-
Setting up the Recovery Environment
The last step connects the Windows boot manager to your custom image, which makes it look like a real recovery option.
You may tell Windows where to find your own WIM file with the help of the reagentc command line tool. This command works by turning on the Windows Recovery Environment (WinRE) and connecting it to the location of your custom image.
Once you sign up, you will be directed to your custom image done through an option to do a System Image Recovery. To make sure the procedure goes smoothly and returns the system to the “factory” condition you want, you may test it by restarting the computer, going to the advanced startup settings, and starting a full restore.
Last Statement
Establishing a custom Windows 10 factory recovery partition is hard work, but it feels great when you’re done. It gives you a powerful, all-in-one approach to restore a system that saves you a lot of time because you don’t have to install core software and drivers by hand. This is the best technique to keep customized Windows 10 environments operating since it keeps systems consistent and functioning properly.
Upgrade your experience — switch to the latest version of Windows now!